
 All of my writing is licensed under a
 Generating a Google Map (KML) from GPS-tagged photos
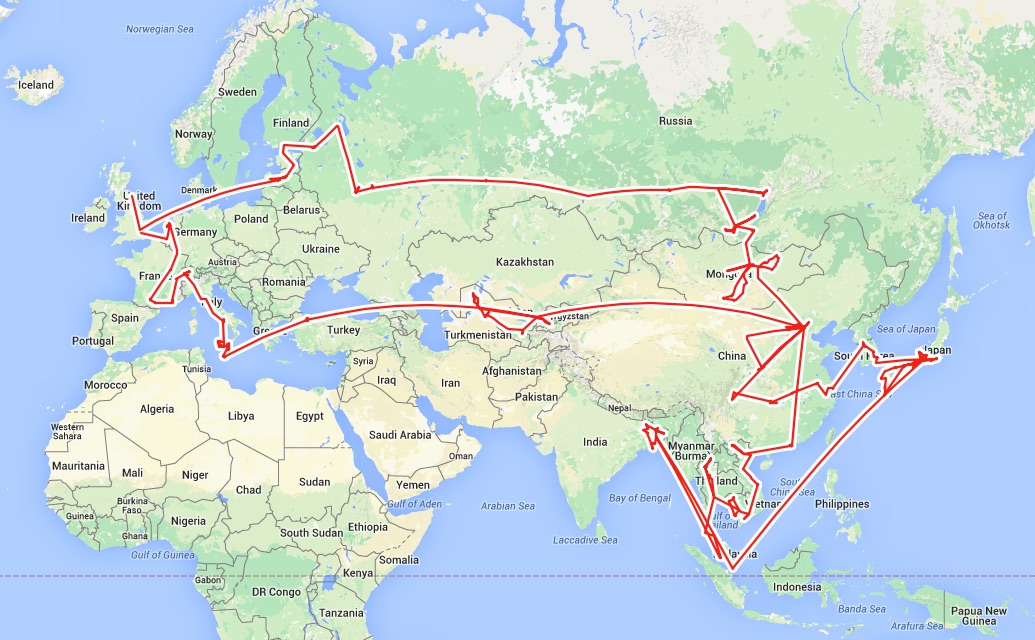
As I’ve written about earlier, my current compact travel-zoom camera is the excellent Panasonic DMC-TZ40. As it saves the GPS coordinates with every photo I take I thought it’d be a fun little exercise to try and script the extraction of this metadata, with a view to plotting the points on a map or even better - drawing a line between them all so I could retrace my steps!
Looping through files is pretty trivial in all programming and scripting languages, and most if not all of them already have JPEG libraries that allow for the straightforward extraction of the photo metadata. The final piece was finding a suitable output format that would be understood for rendering points and lines on maps. Enter KML:
Keyhole Markup Language (KML) is an XML notation for expressing geographic annotation and visualization within Internet-based, two-dimensional maps and three-dimensional Earth browsers - Wikipedia
Google acquired the language in 2004, implemented it in Google Earth and provide excellent documentation of the format.
The result of pulling this all together is the following Ruby script which I’ve called photo-mapper and is an Open Source project on GitHub..
# This Ruby script generates two Keyhole Markup Language files:
#  1. points.kml  - a point for every photo with GPS coords
#  2. route.kml   - a single line that joins every photo with GPS coords
#
# from a folder (and sub-folders) of digital photos
#
# The intention is to create a chronological map of
#  photographed destinations from the digital photos themselves
#
# Usage: ruby photo-mapper.rb starting_directory
# e.g.:  ruby photo-mapper.rb Photos
#
#  http://www.fatlemon.co.uk/photo-mapper

require 'exifr'
require 'date'

# The Panasonic DMC-TZ40 always saves GPS coords. Even indoors. Exclude photos with these coords..
INVALID_GPS_COORDS = [17056881.853375, 17056881.666666668]
# Exclude the following directories when traversing..
IGNORE_DIR = ['.', '..', '.git', '.DS_Store', '@eaDir']
# List of supported photo filename extensions..
ALLOWED_EXTENSIONS = ['.jpg', '.JPG', '.jpeg', '.JPEG']


# Directory traversing class
#  initialized with a starting path, it recursively descends through
#  any directories it finds that aren't in the IGNORE_DIR array above
class Traverse

	def initialize(path, pointsFile, routeFile)
		puts "in " + path
		@files = Dir.entries(path).sort
		@files.each do |f|
			if !IGNORE_DIR.include? f
				if File.directory?(File.join(path, f))
					@t = Traverse.new(File.join(path, f), pointsFile, routeFile)
				elsif File.file?(File.join(path, f))

					# Is this an allowed file?
					if ALLOWED_EXTENSIONS.include? File.extname(f)
						# Does this file have Geo coords?
						puts "Got allowed file #{File.join(path,f)}"

						begin
							@file = EXIFR::JPEG.new(File.join(path, f))
							if @file.exif?()
								# We have EXIF, but do we have sensible Lat & Long?
								if @file.gps != nil
									if !INVALID_GPS_COORDS.include? @file.gps.latitude
										#puts @file.gps
										pointsFile.puts("<Placemark><name>#{f}</name><Point><coordinates>#{@file.gps.longitude},#{@file.gps.latitude},#{@file.gps.altitude}</coordinates></Point></Placemark>")
										routeFile.puts("#{@file.gps.longitude},#{@file.gps.latitude},0 ")
									else
										#puts "No GPS in " + ARGV[0]
									end
								end
							else
								#puts "No EXIF in " + ARGV[0]
							end
						rescue EOFError
							# End Of File can happen for partially copied or uploaded photos
							#  and there's nothing we can do here but report out and skip
							puts "Reached EOF for #{File.join(path,f)} - skipped."
						end
					end

				end
			end
		end

		pointsFile.flush()
		routeFile.flush()

	end
end


# Start the two output files:
pointsFile = File.open('points.kml', 'w')
routeFile = File.open('route.kml', 'w')

date = Date.today

# write the file headers
pointsFile.puts("<?xml version=\"1.0\" encoding=\"UTF-8\"?>
<kml xmlns=\"http://www.opengis.net/kml/2.2\">
<Folder>
	<name>points</name>
	<description>Generated on #{date.strftime('%a %-d %b %Y')} by photo-mapper - http://www.fatlemon.co.uk/photo-mapper</description>
	<open>1</open>")

routeFile.puts("<?xml version=\"1.0\" encoding=\"UTF-8\"?>
<kml xmlns=\"http://www.opengis.net/kml/2.2\">
<Folder>
  <name>route</name>
	<description>Generated on #{date.strftime('%a %-d %b %Y')} by photo-mapper - http://www.fatlemon.co.uk/photo-mapper</description>
  <open>1</open>
  <Style id=\"linestyle\">
    <LineStyle>
      <color>ff000000</color>
      <width>2</width>
    </LineStyle>
  </Style>
  <Placemark>
    <name>Route</name>
    <styleUrl>#linestyle</styleUrl>
    <LineString>
      <extrude>1</extrude>
      <tessellate>1</tessellate>
      <coordinates>")

go = Traverse.new(File.absolute_path(ARGV[0]), pointsFile, routeFile)

# Close the files
pointsFile.puts("
</Folder>
</kml>")
pointsFile.flush()

routeFile.puts("</coordinates>
    </LineString>
  </Placemark>
</Folder>
</kml>")
routeFile.flush()

# Done  :o)
For the route output, the script assumes that sorting the directories and files alphabetically will result in the same order the photos were taken. This should be true and work fine in most cases. Personally, I organise my photos like so:
  year
    month
      day - with short description of the day or the location
        photo.jpg, photo2.jpeg, etc..
e.g:
  2012
    01 - January
      01 - New Years day dip in the North Sea
        DSC01265.jpg, DSC01266.jpg, etc..
      02 - Discharged from hospital after recovering from hypothermia
        DSC01271.jpg
    02 - February
      29 - Cycle-ride along the coast
        DSC01411.jpg, etc..
Viewing with Google Earth
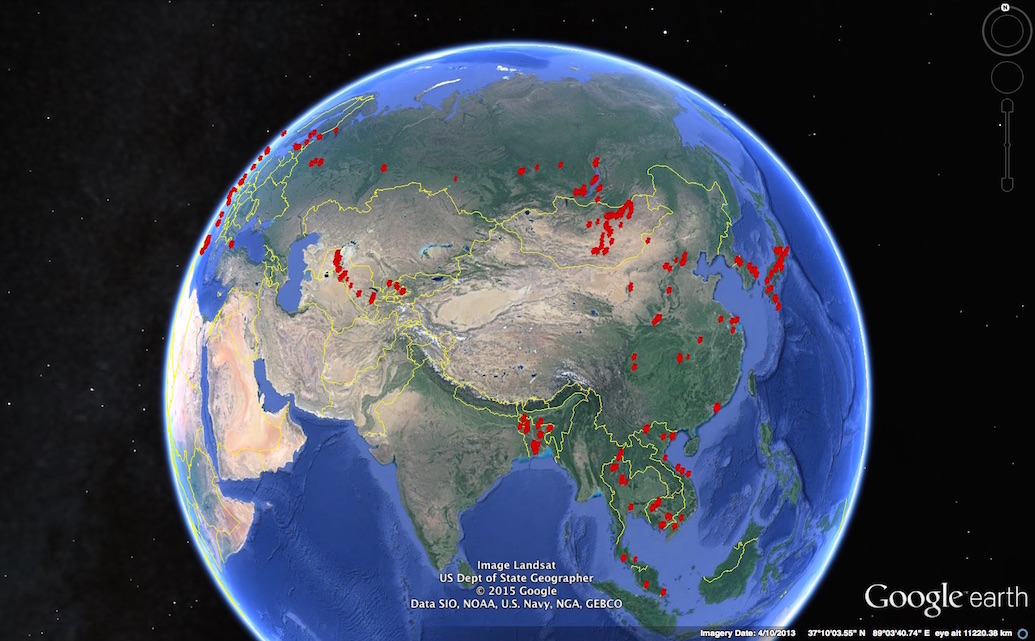
Google Earth natively supports KML, so once you have it installed and open, just go to File > Open and select either points.kml, route.kml or both!
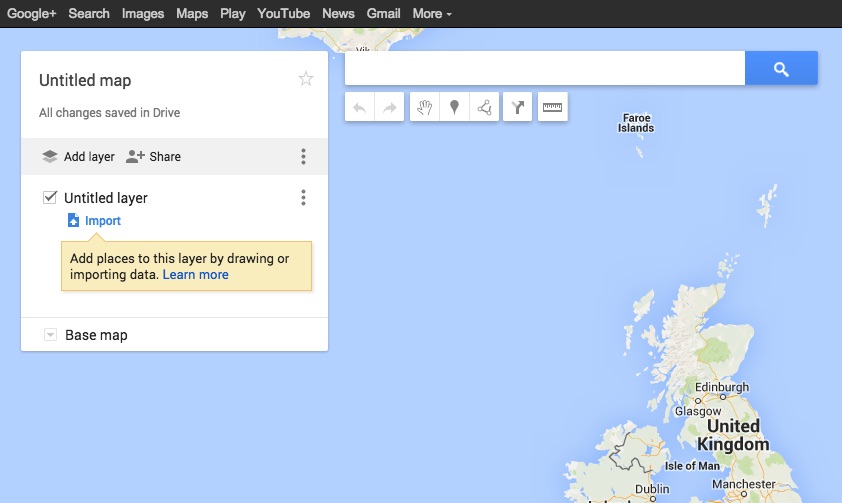
Viewing with Google Maps
Google Maps also understands KML files, but there are some limitations which I’ll point out in a moment.
- First, head over Google Maps and sign in with your Google+ account, or create one
- Next, expand the Google Maps menu by clicking on the 3 horizontal bars inside the maps search box on the left, then choose ‘My Maps’ and ‘Create’
- You’ll get a new web-browser tab with a new map in it. Simply click the highlighted ‘Import’ link under the ‘Untitled layer’ and select the
points.kml,route.kmlor both!
However..
You’ll likely run into the following message..
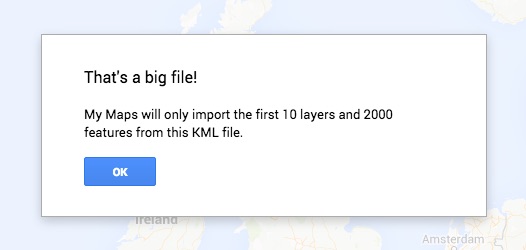
For now at least, Google Maps is limited to the number of points and lines it can process. photo-mapper generates a single layer, but each photo will be a point so we’re currently limited to 2,000 geotagged photos.
Google’s retired MapsEngine could handle far more data so I think it’ll just be a matter of time before this restriction is lifted.